How To: Create A Media Kit For Your Blog.

How To Create A Media Kit For Your Blog.
Blog media kits - a bit of a grey area at the moment. Some people don't think you need them, some think it's essential for working with brands, some call it a rate card, some call it a blog CV....and then when it comes to what to include? Nightmare.
Personally I think they make a really nice professional addition to your blog, especially if you're keen to work with brands and companies and I created one two months ago.
It's also something that bloggers tend to keep close to their chest, when I was looking for inspiration I found it really hard to find bloggers who'd written decent posts on it or more importantly, any physical copies I could see for inspo other than things on Pinterest.
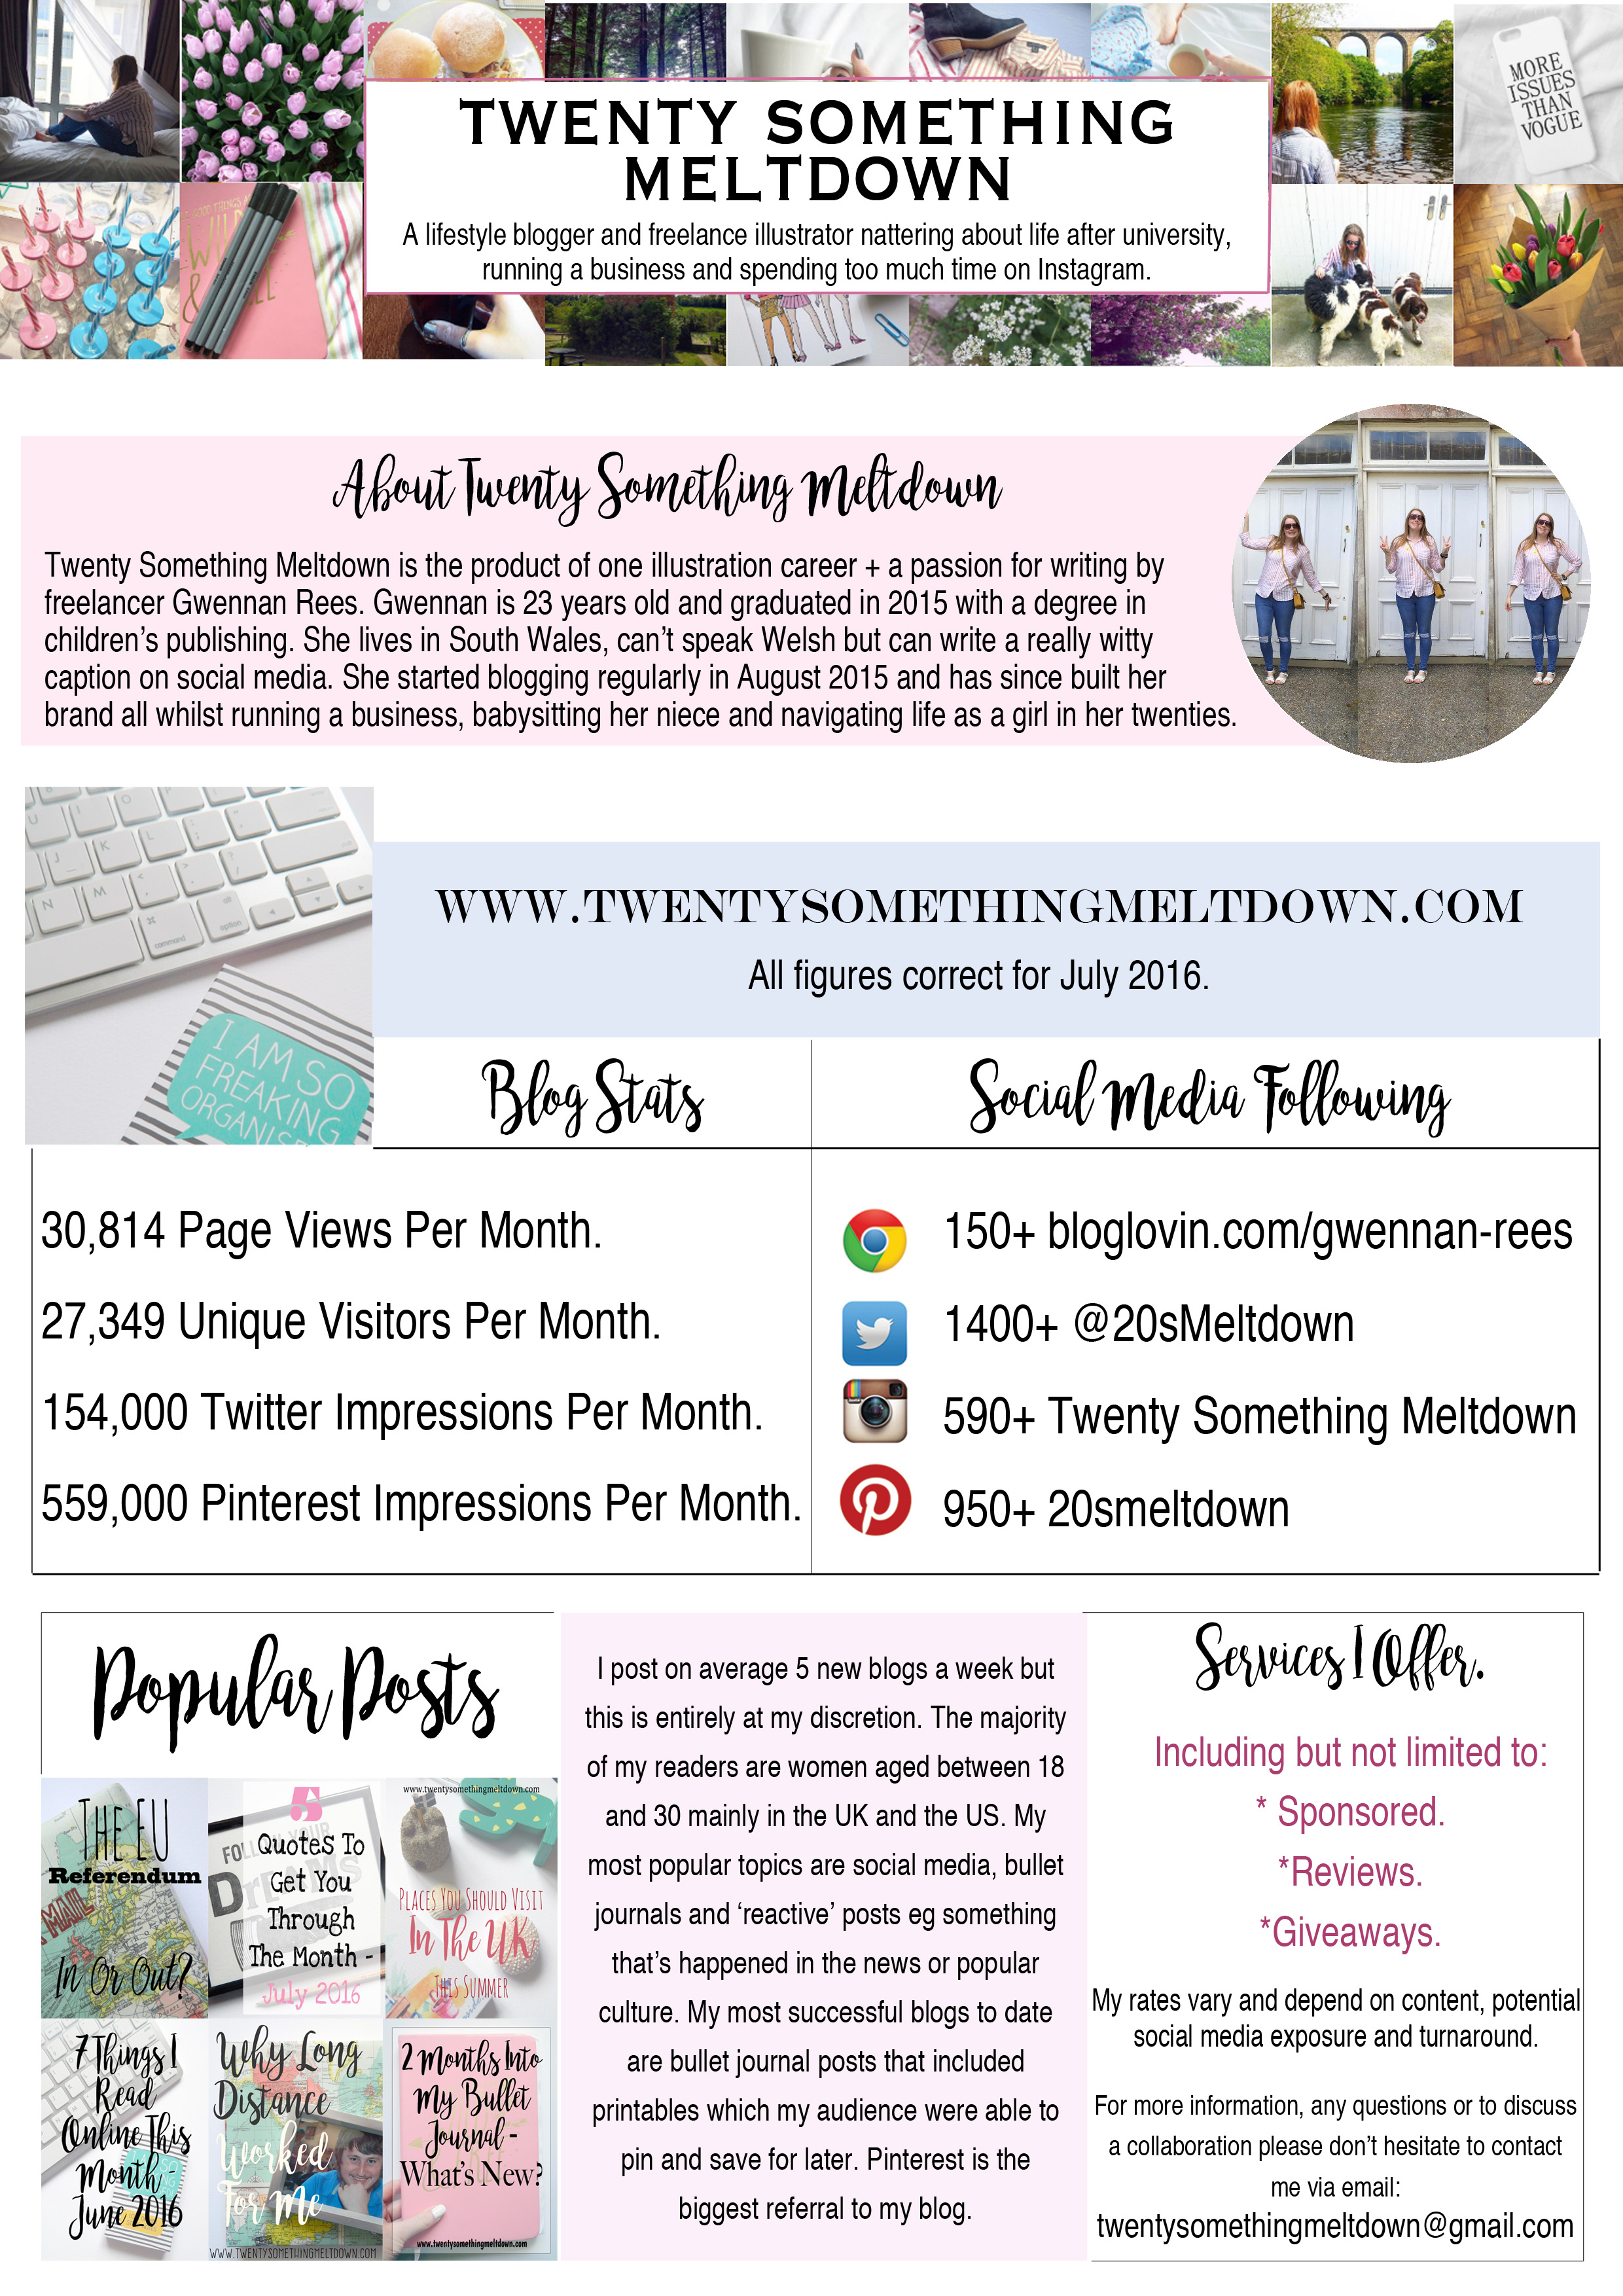
Therefore, I thought I'd write my own little nugget of information and include a copy of my July 2016 media kit to help demonstrate. Just please don't copy the entire thing k thanks bye.
1. Use whatever programme is easiest for you.
I created my media kit on Photoshop just because I own it for my business and I've been using it since I was 17 so it's my preferred programme but you can create a media kit on whatever programme you like. If you only have programmes you don't like using have a Google for free programmes or Adobe have a bunch of trials you can use too.
2. Start with a photo.
Blogging is a super personal thing and including a photo immediately gives the brand or the PR a closer connection to you. Try and make it the same as your current social media profile picture so they can link you with you online and make it reasonably big and clear.
3. Add a banner.
Again, totally personal but I really like a banner at the top of my media kit. I use mine as a bit of an introduction to my blog, like if you could have one word to describe your blog this is where I'd put it. My banner is a combination of photos I've taken from my Instagram to give a bit of an insight into the way my blog looks but I have seen a few people but their blog header here or one big photo.
4. Write a bit about yourself.
This is key. Media kits are mainly a way of brands and PRs finding out about your stats and what collaborations you might have together but you need to be personable. Start your page with a photo and a little bit about yourself and when you started your blog and what you do outside blogging. Be friendly, include your real name if you blog under a pseudo name
5. Include your website.
This sounds so simple but it's so easy to forget - make sure you include your blog address written down somewhere. Just remember, especially if you are emailing out your media kit rather than having it on your blog, PRs might be getting A LOT of these types of kits, just give them a little reminder who you are.
6. Include your stats.
Obviously. This is basically what a media kit is for, it shares your stats with the people who want to know and gives them a bit more information on the ins and outs of your blog. You can include what statistics you want really but try and make it relevant to a short space of time in your blog. Break it down to monthly or something like that because our stats will jump around and you want to paint a true representation of your blog and how it's doing.
7. Outline your following.
Again, super important. I know brands could just go and look on all your social media to see how many followers you have on that day but you want to make it as easy as possible for them to see all your statistics in one place. Include whatever social media accounts you're active on and omit anything you don't put effort into. There's no point me putting my average snapchat impressions on my media kit when I don't put any time into it. If someone wants to know more, they'll ask.
8. Give a bit more info on your blog.
This bit is kinda personal and can be done in any way you want - I have included some of my popular posts so if the reader wants to check them out and see what type of thing is successful on my website, they know what kind of tone I write in. I also outline my posting schedule and what my most popular ever post was. This is where ideally you want to share your demographic such as their age, sex and where they're reading from as this gives brands a clearer picture of who they can reach if they work with you.
9. Be clear about what you offer.
There's no point a brand getting in touch if you don't offer what they want on your blog; just outline what you will and won't do and it avoids any awkward questions further down the line. Unless you're like Hannah Gale or Zoella or summin who are at the tip top of your game and know what you can charge for certain things, I wouldn't put a price personally. All jobs are individual and I always think it's best to just put a disclaimer explaining that.
10. Add your contact info.
Again, something so simple but a cardinal sin if you forget it. Include your contact info on your media kit, get that email address in there somewhere. At the end of the day we all know brands can just search your website for your social media handles or your email address but you want to make it as easy as humanly possible. At the end of the day it might be the person with the contact info right in front of them they get in touch with rather than the person they have to Google.
11. Make it visually interesting.
The look of our blogs these days is just as important as the words, and your media kit should be no different. Obviously I'm an illustrator so the way my media kit looks is important to me but even if you don't have the most visually creative mind, making it clean and easy to read, separating it into sections and boxes and including photography is easy enough for anyone. The biggest piece of advice I could give if you don't know where to start is make it look like your blog theme and begin there.
12. Update it.
This is so easily forgettable but there's nothing worse than being asked for your media kit and not having an updated version, it's just like your CV. Keep an eye on your stats and following to make it easier but make sure to always have the most updated version to hand. I update mine monthly, just because my blog is growing so much month on month but once that levels out I will most likely just update it quarterly.
13. Save it as something recognisable.
Assuming the people you need to send your media kit to are getting lots of these, you need to save yours as something recognisable to you so they can find it easily on file when they need to. The easiest way to do this is to simple save it as your blog name media kit. Simple.
14. Export it as PDF.
I think this is the best way to save your media kit and I have yet to see another post on the topic saying to save it in any other way. Everyone's computers are different, respond differently and have different programmes on them - there's no point sending your media kit as a Photoshop file when the recipient can't open it. 99% of people will be able to open and use an Adobe PDF and it just makes it so much easier for everyone to send it, as a relatively small file that way.
15. Keep it simple.
I've seen a few media kit guides saying different things but personally I think you can fit everything you need to onto one PDF page. I would say 2 at a push but I definitely would be wary of any more simply because the PR or whoever is reading just needs to basic facts and stats, any more info they can read on your blog. It's a good exercise of getting all the most important info for your blog down to a few boxes if nothing else.
At the end of the day, a media kit or rate card or whatever you want to call it is just as personal and individual as your blog and I am by no means an expert, but I hope it gives you some inspiration or at least the drive to make a better one than me!!